Managing Kubernetes Secrets using SOPS

We all have been using .env files for microservices, which is typically a configuration file used to store environment-specific variables and settings. These files are usually plain text file which poses security risk. If the file is accidently exposed or included in version control, it can lead to data breaches.

When we use them in Kubernetes as secrets it can bring about various difficulties and challenges:

  1. Security Risks: Secrets frequently contain sensitive data like passwords, tokens, and certificates. Inadequate management can lead to security vulnerabilities and breaches.
  2. Manual Complexity: Traditional manual handling of secrets is prone to errors, especially in larger setups with numerous pods and microservices.
  3. Encryption Gaps: Kubernetes secrets are encoded in Base64, but lack default encryption. This means unauthorized access to the cluster can easily decode them.
  4. Access Control Limitations: Kubernetes secrets offer limited control over access. Access is usually controlled at the namespace level, which might not be suitable for intricate scenarios.
  5. Rotation Complications: Regularly rotating secrets for better security can be intricate and might necessitate downtime or specialized tools.
  6. Auditing and Compliance: Ensuring authorized access to secrets and monitoring their usage for compliance can prove challenging.
  7. Versioning Hurdles: Kubernetes secrets lack inherent version tracking. Updates overwrite existing secrets, making it difficult to trace changes or revert to prior versions.
  8. Secret Proliferation: As microservices and applications increase, managing secrets across various namespaces and clusters can become unwieldy.
  9. Centralized Management Gap: Kubernetes secrets may not offer a centralized view or interface for managing secrets across clusters.
  10. Integration Complexity: Integrating Kubernetes secrets with external secret management tools or key management systems often requires custom setups and additional complexities.

To mitigate these issues, organizations often adopt specialized secret management tools and practices that enhance security, automation, encryption, access control, and simplify secret rotation.

One such tool is Mozilla’s SOPS tool.

What is SOPS?

Mozilla SOPS, or Secrets OPerationS, stands as an open-source tool meticulously crafted by Mozilla. It serves a singular purpose: to streamline the intricacies of handling encrypted files that house confidential data and configuration specifics. Its primary application lies in safeguarding sensitive content within configuration files, particularly within environments involving version-controlled repositories and configuration management systems.

The core strength of SOPS lies in its adaptability to a diverse range of encryption techniques and key management frameworks. This versatility is further enhanced by its integration capabilities with renowned key management platforms, including AWS Key Management Service (KMS), Google Cloud KMS, HashiCorp Vault, among others. By utilizing SOPS, you gain the ability to encode and decode sensitive information embedded within files, all managed by external key management systems.

In essence, Mozilla SOPS offers a powerful solution for navigating the complexities of encrypted secrets and configuration data. It excels in preserving the security of vital information, all while seamlessly aligning with modern development practices and deployment methodologies.

Let’s jump straight to action !

Installation of SOPS

wget https://github.com/mozilla/sops/releases/download/v3.7.1/sops_3.7.1_amd64.deb
sudo dpkg -i sops_3.7.1_amd64.deb
sudo apt install -f
sops --version
sops --help

Install Age

Age is a simple, modern and secure file encryption tool, format, and Go library. We shall generate agekey and use it for encryption and decryption of secrets yaml file.

This is available in github project https://github.com/FiloSottile/age

AGE_VERSION=$(curl -s "https://api.github.com/repos/FiloSottile/age/releases/latest" | grep -Po '"tag_name": "(v.*)"' |grep -Po '[0-9].*[0-9]')

curl -Lo age.tar.gz "https://github.com/FiloSottile/age/releases/latest/download/age-v${AGE_VERSION}-linux-amd64.tar.gz"

tar xf age.tar.gz
mv age/age /usr/local/bin
mv age/age-keygen /usr/local/bin

Generate a newkey using Age

age-keygen -o agekey
export SOPS_AGE_KEY_FILE=$HOME/.sops/agekey

mkdir ~/.sops
cp ./agekey ~/.sops/

Encrypt secrets yaml files

sops --encrypt --encrypted-regex '^(data|stringData)$' --age $(cat ~/.sops/agekey |grep -oP "public key: \K(.*)") login-api.yaml > login-api-enc.yaml

After this a login-api-enc.yaml file will be created. If you open and see the file, the content will be encrypted.

To edit the encrypted file you have to use sops

sops login-api-enc.yaml

To decrypt and apply to kubernetes cluster

sops -d login-api-enc.yaml | kubectl apply -f -

To see the values in the secrets

k get secrets -n phoenix-uat

kubectl get secrets login-api-secrets -n phoenix-uat -o json | jq '.data | map_values(@base64d)'

Now you can push the encrypted secrets yaml files to the github repo and maintain it without worries.

If the file gets compromised then without the agekey it can’t be decrypted.

Note: Make sure you keep the agekey secure by keeing it in AWS KMS and using it from there.

Bitbucket pipelines to deploy into S3

Bitbucket pipeline provides easy and faster way to build and deploy apps into S3 bucket. These can be ReactJs and AngularJs frontend applications.

I will walk you through how to setup bitbucket pipeline, create bitbucket pipeline yaml file and then host that into S3 using static webhosting. Also we will integrate S3 bucket with CloudFront distribution to make the web page accessible from domain name.

Steps follow as below:

  1. Create S3 bucket
  2. Configure bitbucket pipeline
  3. Create bitbucket-pipelines.yaml script
  4. Create and integrate CloudFront distribution
  5. Test the pipeline

Step 1: Create a S3 bucket

This bucket will contain the static pages for the webapp code.

Step 2: Enable and configure bitbucket pipeline

On the bitbucket repo, click on the “Pipelines” in the left side window and Enable it.

Next click on “Repository settings” –> “Deployments”

Here you can add the environments like dev, uat, prod etc..

Step 3: Create bitbucket-pipelines.yaml script

Create the bitbucket-pipelines.yaml script in the respective branch with below content.

The below pipeline script is for a ReactJs application, I have mentioned 2 branch names: master and uat

When the code is pushed to respective branch, the pipeline will trigger. It will fetch the environment variables given in the Deployments section. Builds the code and then copies the contents of build directory to mentioned S3 bucket. The pipeline has a step to invalidate the CloudFront cache. You will have to provide the CloudFront distribution ID as an environment variable.

To immediately serve updated files, invalidate the files to remove objects from CloudFront’s cache.

pipelines:
  branches:
    master:
      - step:
          name: Build and deploy the app on Production
          image: node:latest
          script:
            - export React_app_url="https://app.phoenix.cloud"
            - npm install
            - CI=false REACT_APPURL=$React_app_url npm run build
          artifacts:
          - build/**
      - step:
          name: Deploying the app to S3 bucket and invalidate CloudFront cache
          deployment: master
          script:
            - pipe: atlassian/aws-s3-deploy:0.2.4
              variables:
                AWS_ACCESS_KEY_ID: $AWS_ACCESS_KEY_ID
                AWS_SECRET_ACCESS_KEY: $AWS_SECRET_ACCESS_KEY
                AWS_DEFAULT_REGION: $AWS_REGION
                S3_BUCKET: $S3_BUCKET
                LOCAL_PATH: "build"
            - pipe: atlassian/aws-cloudfront-invalidate:0.1.1
              variables:
                AWS_ACCESS_KEY_ID: $AWS_ACCESS_KEY_ID
                AWS_SECRET_ACCESS_KEY: $AWS_SECRET_ACCESS_KEY
                AWS_DEFAULT_REGION: $AWS_REGION
                DISTRIBUTION_ID: $STAGING_DISTRIBUTION_ID
    uat:
      - step:
          name: Build and test the app on UAT
          image: node:latest
          script:
            - export React_app_url="https://uat-app.phoenix.cloud"
            - npm install
            - CI=false REACT_APPURL=$React_app_url npm run build
          artifacts:
          - build/**
      - step:
          name: Deploying the app to S3 bucket and invalidate CF cache
          deployment: uat
          script:
            - pipe: atlassian/aws-s3-deploy:0.2.4
              variables:
                AWS_ACCESS_KEY_ID: $AWS_ACCESS_KEY_ID
                AWS_SECRET_ACCESS_KEY: $AWS_SECRET_ACCESS_KEY
                AWS_DEFAULT_REGION: $AWS_REGION
                S3_BUCKET: $S3_BUCKET
                LOCAL_PATH: "build"
            - pipe: atlassian/aws-cloudfront-invalidate:0.1.1
              variables:
                AWS_ACCESS_KEY_ID: $AWS_ACCESS_KEY_ID
                AWS_SECRET_ACCESS_KEY: $AWS_SECRET_ACCESS_KEY
                AWS_DEFAULT_REGION: $AWS_REGION
                DISTRIBUTION_ID: $STAGING_DISTRIBUTION_ID

Step 4: Create and integrate CloudFront distribution

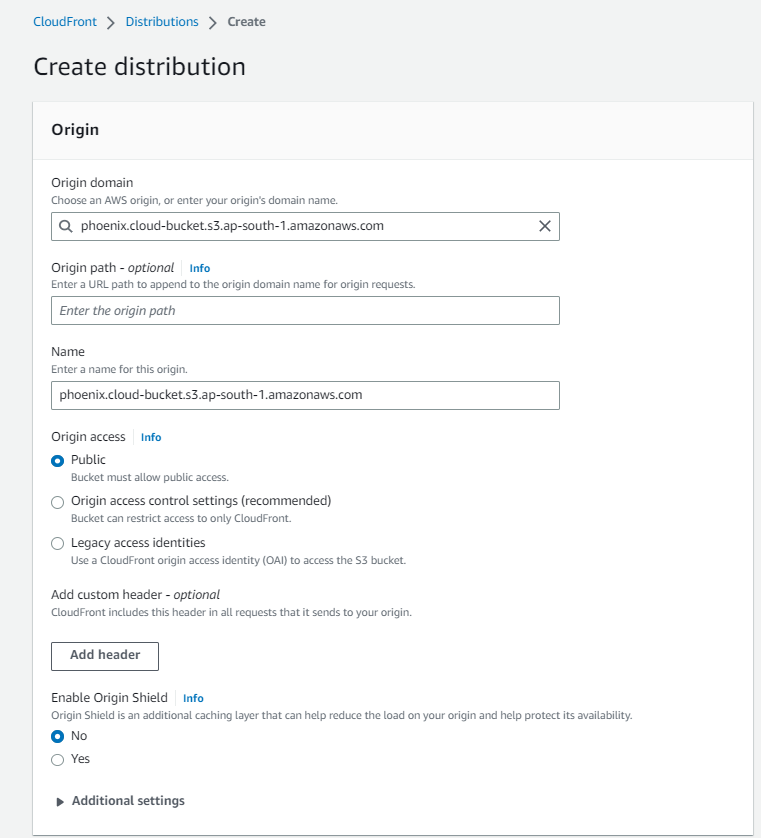
While creating CloudFront distribution it asks to choose an S3 bucket.

Step 5: Test the pipeline

Once you push the code to the repo, the pipeline will automatically run for the respective branch.

Also you can verify the CloudFront cache invalidation details from AWS console.

AWS vs OCI – Services naming convention

In past couple of months, my team has been working on migrating the infra setup from Amazon Web Services (AWS) to Oracle Cloud Infrastructure (OCI) cloud. This is part of FinOps to get maximum business value by reducing cloud cost. This cultural practice enabled strong collaboration between different teams and gave us a steep learning curve.

While working on this I noticed that both clouds offer similar services but are named differently. Identifying them made our migration task easy as we had to use the relevant OCI services with same setup, automation and code used in AWS.

I have created below table with most comparing the most frequently used services:

AWS Service NameOCI Service NameDescription
RegionRegionLocalized Geographic Area comprising one or more Availability domains
Availability zoneAvailability DomainComprising one or more Fault tolerant data centers located within a region
Fault IsolationFault DomainLogical data centers within Availability Domains. A fault domain is a grouping of hardware and infrastructure that is distinct from other fault domains in the same availability domain. Each availability domain has three fault domains.
AWS resource groupsCompartmentLogical collection of related resources. Helps to organize, isolate and control access to the cloud resources.
Root userTenancy AdminCloud account admin user. Only this user has permissions to delete the account.
IAM usersIAM usersIdentity and Access Management (IAM) is a web service that helps you securely control access to resources.
IAM groupsIAM groupsAn IAM group is an identity that specifies a collection of IAM users.
IAM PoliciesIAM PoliciesHuman readable statements to define granular permissions
IAM RolesIAM PrincipalsA role/principals is a set of permissions that grant access to actions and resources in AWS.
IAM FederationIAM FederationFederated identity allows authorized users to access multiple applications and domains using a single set of credentials. It links a user’s identity across multiple identity management systems so they can access different applications securely and efficiently.
Virtual Private Network (VPN)Virtual Cloud Network (VCN)A virtual network in the cloud which supports multiple CIDR blocks in a single network.
Internet GatewayInternet GatewayUsed by instances in public subnets to connect to the internet. It’s a two-way communication (both inbound and outbound traffic to the internet).
NAT GatewayNAT GatewayUsed for communication to the internet by the instances in the private subnet. It’s a one-way communication (outbound traffic to the internet only).
AWS PrivateLinkService GatewayA service gateway lets your virtual cloud network (VCN) privately access specific Oracle services without exposing the data to the public internet. 
Virtual Private GatewayDynamic Routing GatewaySite-to-Site VPN connect, Fast Connect.Virtual router which provides path between VCN and destinations other than internet.(On-premises environments) 
Amazon NeptuneNetwork VisualizerThe Network Visualizer provides a diagram of the implemented topology of all VCNs in a selected region and tenancy.
Security GroupsSecurity ListsControls the traffic that is allowed to reach and leave the resources that it is associated with.
Access Control ListsNetwork Security GroupsThis is a list of rules that specifies which users or systems are granted or denied access to a particular object or system resource.
VPC PeeringLocal Peering using DRGConnect one VCN to another VCN within a region.
EC2 instancesCompute InstancesVirtual instances in Cloud.
ec2-useropcDefault username for the instances.
Public IP addressEphemeral IP addressAutomatically assigned from the pool.
Elastic IP addressReserved IP addressCreate one by assigning name and source IP pool.
Spot InstancesPreemptible InstancesInstances which are less costly, but can be taken away at anytime.
Launch TemplatesInstance configurationUsed by Auto Scaling to scale-in and out the VM’s
EBS volumeBlock volumeAttach disks to keep the data backup even after deletion of instances.
S3 BucketObject StorageThis is a promising, stable, and highly scalable online storage solution. Objects are stored inside buckets.
Elastic File System (EFS)File StorageThis automatically grows and shrinks as you add and remove files with no need for management or provisioning.
Amazon AuroraAutonomous Transaction Processing (ATP)It is a web service running “in the cloud” designed to simplify the setup, operation, and scaling of a relational database for use in applications.
Amazon Database Migration ServiceOracle GoldenGateThis is a software product that allows you to replicate, filter, and transform data from one database to another database.
Elastic Kubernetes Service (EKS)Oracle Kubernetes Engine (OKE)Kubernetes is open-source software that allows you to deploy and manage containerized applications at scale. This is a managed service that you can use to run Kubernetes on AWS without needing to install, operate, and maintain your own Kubernetes control plane or nodes.
Elastic Container Registry (ECR)Oracle Cloud Infrastructure Registry (OCIR)This is a managed container image registry service that is secure, scalable, and reliable.
Lambda FunctionsOCI FunctionsThis is a compute service that lets you run code without provisioning or managing servers.
CloudFormationOracle Resource ManagerThis is a managed service that automates deployment and operations for all Cloud Infrastructure resources.
API GatewayAPI GatewayThis is a fully managed service that makes it easy for developers to create, publish, maintain, monitor, and secure APIs at any scale.
Secrets ManagerVaultThis helps you manage, retrieve, and rotate database credentials, API keys, and other secrets throughout their life cycles.
AWS EMROracle Big Data Cloud ServiceThis is a cloud big data platform for running large-scale distributed data processing jobs, interactive SQL queries, and machine learning applications.

Below article by Oracle gives more info on other services

https://docs.oracle.com/en/solutions/oci-for-aws-professionals/index.html

Python script to delete piled up services in AWS ECS cluster

Amazon ECS is a fully managed container orchestration service that makes it easy for you to deploy, manage, and scale containerized applications.

The Docker containers in AWS ECS have high scalability and performance and allows to run applications on a AWS managed cluster. ECS is free to use and you only pay for the underlying ECS instances of the cluster.

This is mainly used run web applications so they can be scaled up and down as per the traffic load or requirement.

ECS has below things:

Task definition – It is like a blueprint which contains the details of image name, memory allocation, volumes etc which will be used by container to run your application.

Service – This allows and maintains a desired number of tasks (containers) in the cluster.

Task – This is a docker container which runs the application.

The ECS can be used to run web applications or any other code inside docker containers. Since it has auto-scaling feature, it is easy to scale up and down to run analytics jobs.

A scheduler will be used to submit these jobs as services to cluster. Sometimes the containers take long time to finish, or go to hung state etc which results in pile up on services on the cluster.

Below you can see there are 5000+ services waiting to be allocated to instances or pending to be started. This can happen when instances are less in cluster which doesn’t have enough memory to allocate the defined services.

Now how do we delete so many services in less time?

We can delete them manually by selecting them on the console itself. But it allows to delete only one service at a time. This makes it difficult and time consuming for manual intervention.

I created below python script using boto3 framework to automate the deletion.

Note: While using the script it allows only to list 100 services at a time. Also you get rate limited if you submit multiple service deletion calls to ECS cluster. So I have added a delay of one second.

The script deletes100 services at a time and runs for 50 times in loop to delete 5000 services.

#!/usr/bin/python
# -*- coding: utf-8 -*-

import boto3
import time

client = boto3.client('ecs', region_name='ap-south-1')

def qa_cluster_service_deletion():
    sp_conn = client.list_services(cluster='cluster-qa', launchType='EC2', maxResults=100, schedulingStrategy='REPLICA')
    for service in sp_conn['serviceArns']:
        print(service)
        spipe_resp = client.delete_service(cluster='cluster-qa', service=service, force=True)
        time.sleep(1)

for i in range(1,50)[::-1]:
    qa_cluster_service_deletion()

After running the script the queued up services will be deleted and you should like below

Installation of Oracle Instantclient & library path set for Python Django, FastAPI, ReactJs applications

Recently I have been working on migration of applications from AWS cloud to Oracle Cloud (OCI)

To start with we are using Ubuntu 22.04 linux server in Oracle cloud.

We use Python Django application and run it using uwsgi service.

Below is the issue or the error I encountered:

django.db.utils.DatabaseError: DPI-1047: Cannot locate a 64-bit Oracle Client library: “libclntsh.so: cannot open shared object file: No such file or directory”. See https://cx-oracle.readthedocs.io/en/latest/user_guide/installation.html for help
cx_Oracle 8 Installation — cx_Oracle 8.3.0 documentation

To resolve this error we need to setup Instant Client on the server.

Currently Instant Client installer file is available for RHEL and CentOs VM’s. The instant client download page as the links to download the RPM files

https://www.oracle.com/database/technologies/instant-client/downloads.html

To setup instant client on Ubuntu server, we need to download the zip file and set the path.

Create a path in your home directory

mkdir instantclient

wget https://download.oracle.com/otn_software/linux/instantclient/218000/instantclient-basic-linux.x64-21.8.0.0.0dbru.zip

unzip instantclient-basic-linux.x64-21.8.0.0.0dbru.zip

After this set the below path on server level (make sure to add the instant client file path)

sudo sh -c “echo /home/devops/wallet/instantclient_21_8 > \
/etc/ld.so.conf.d/oracle-instantclient.conf”
sudo ldconfig

Next download the Wallet zip file by following below steps.

To download client credentials from the Oracle Cloud Infrastructure Console:

  1. Navigate to the Autonomous Database details page.
  2. Click DB Connection.
  3. On the Database Connection page select the Wallet Type:
    Instance Wallet: Wallet for a single database only; this provides a database-specific wallet.
    Regional Wallet: Wallet for all Autonomous Databases for a given tenant and region (this includes all service instances that a cloud account owns).Note: Oracle recommends you provide a database-specific wallet, using Instance Wallet, to end users and for application use whenever possible. Regional wallets should only be used for administrative purposes that require potential access to all Autonomous Databases within a region.
  4. Click Download Wallet.
  5. In the Download Wallet dialog, enter a wallet password in the Password field and confirm the password in the Confirm Password field.
  6. Click Download to save the client security credentials zip file. By default the filename is: Wallet_databasename.zip. You can save this file as any filename you want. You must protect this file to prevent unauthorized database access.

After download copy the zip file to server and extract it.

Add the wallet directory location to the .env file and refer it in the code.

GitHub and Jenkins Integration using Webhook – Latest

This post explains latest steps to setup Webhook between GitHub and Jenkins.

In GitHub the option of “Integrations and services” is deprecated and now we have to use “Webhooks” to achieve this.

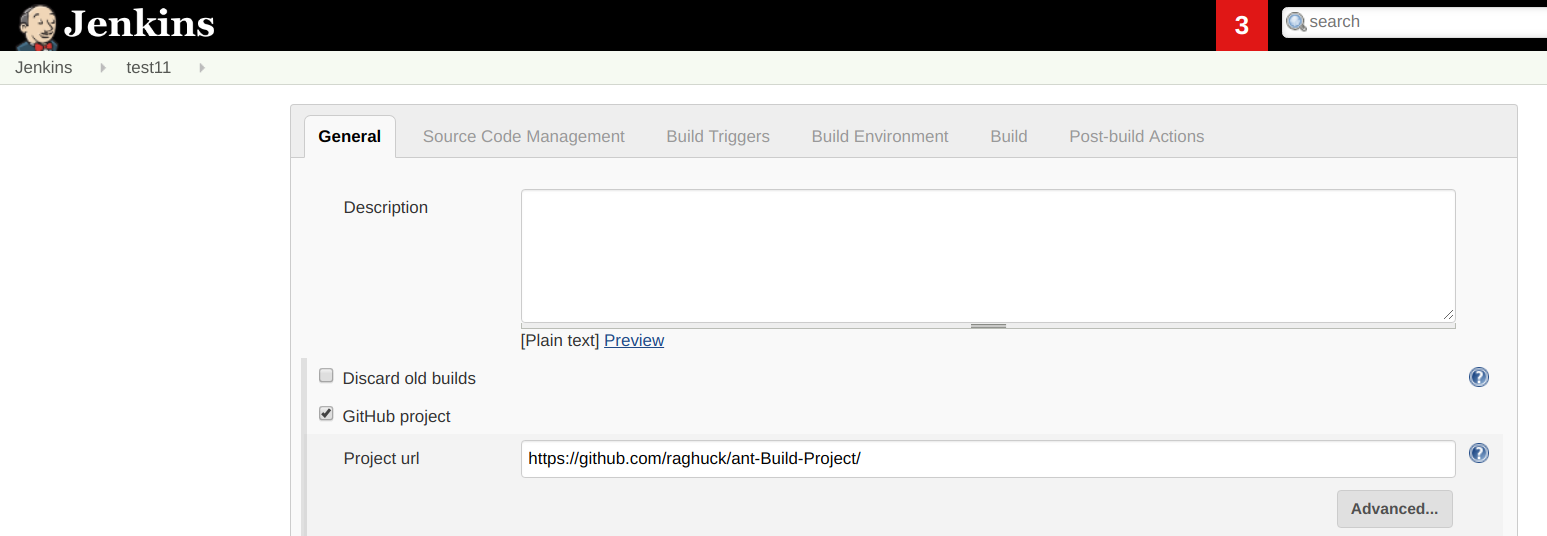
Install “GitHub Integration plugin”, “GitHub Authentication” and “GitHub Pull Request Coverage Status” in Manage Plugins of the Jenkins Dashboard.

jenkins1

Let’s assume you have deployed Jenkins in Tomcat application server running on ec2 Linux instance. The default port number of Tomcat running on will be 8080

Run below command on your ec2 Linux instance terminal to get a endpoint link accessible from internet. This will generate http and https endpoint links.
./ngrok http 8080
Note: make sure you keep this terminal session open or run this as background task. Everytime you re-run this command a new url will be generated.

Copy the https endpoint link and append it by “github-webhook/”, for example like below
https://54dcdcd9.ngrok.io/jenkins/github-webhook/

Click on your Github repository and go to Settings
Click on Webhooks and then click on “Add webhook”

Paste the above url generated from ngrok into the Payload URL field
Select Conent type field as “application/json”
Select checkbox “Enable SSL verification”
Select the checkbox “Just the push event”
Enable Active and Update webhook

git1

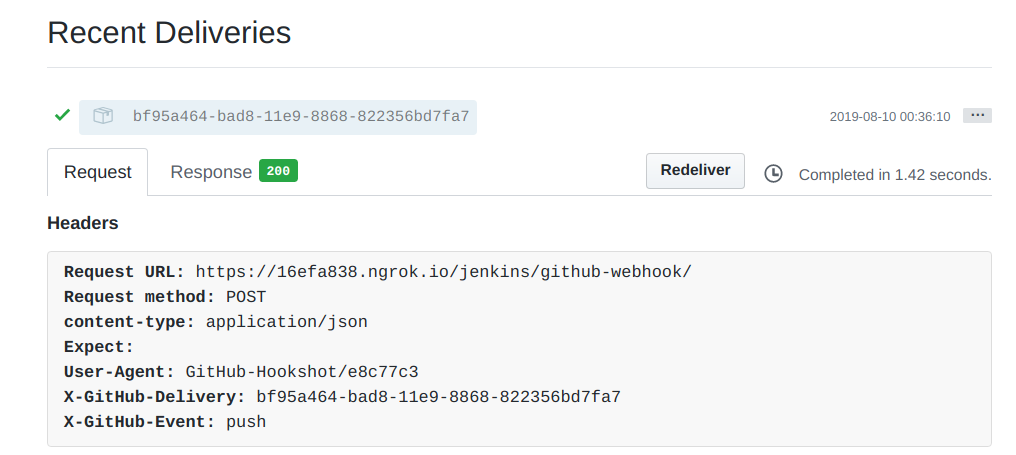
Now GitHub will try to establish connection with Jenkins. If the connection is successful then you will get green tick mark as shown in below image

git2

If you are getting error saying “invalid request response 403” or “invalid request response 404” like shown in below image.

git3

Then in Webhooks page of GitHub scroll down and click on Redeliver message. This will try to establish connection and then it will get connected.

git4.png

Next commit and push new file or modify a file in repository and push it. This will trigger the Jenkins job automatically.

jenkins2

Delete old AMI’s by filtering with tags using boto3 and Lambda

Hello,

When you are building custom AMI’s in AWS account you will need to manage them by deleting the old AMI’s and keep only few latest images. For this you can use the below python code in Lambda function. I took the below code as reference from here and modified it to delete the AMI’s by filtering the images which has only specified tags.

Filtering the images with tags is important as different teams/projects will be having their images and it avoids accidental deletion of the wrong images.

Note: Before executing this code make sure your AMI’s are tagged.

    Code explanantion:

* First import libraries datetime, boto3 and time.
* Next get the ec2 connection session using boto3.
* Assign a variable older_days and pass the value as days (all images which are older than specified days from the present date will be filtered)

* Invoke the main function lambda_handler and then
* Invoke the function get_ami_list by passing older_days as a parameter

* Function get_ami_list uses ec2 descirbe_images to get all the images details which has specified ownerid as the owner
* Next it will invoke the function get_delete_date, calculates and finds out the date which is 5 days past from the present date
* Next the images will be filtered according to the specified tag value and if the image is older then 5 days.
* Then images are further filtered if older than 5 days and deregistered by invoking function delete_ami

from datetime import datetime, timedelta, timezone
import boto3
import time

client.ec2 = boto3.client('ec2', region_name='us-east-1')

#Here all images which are older than 5 days from the present date will be filtered
older_days = 5

def lambda_handler(event, context):
    get_ami_list(older_days)

def get_ami_list(older_days):
    amiNames = client.ec2.describe_images(Owners=['123456789123'])
    print(amiNames)
    today_date = datetime.now().strftime('%d-%m-%Y')
    print("Today's date is " + today_date)
    deldate1 = get_delete_date(older_days)
    print("AMI images which are older than " + str(deldate1) + " will be deregistered")
    for image in amiNames['Images']:
        taginfo = image['Tags']
        for tagName in taginfo:
			#Filter only the images having tag value as Proj1AMI
            if (tagName['Value'] == 'Proj1AMI'):
                ami_creation = image['CreationDate']
                imageID = image['ImageId']
                print("=================================================")
                print("Image id is " + imageID)
                print("Creation date for above image is " + ami_creation)
                if (str(ami_creation) < str(get_delete_date(older_days))):
                    print("This AMI is older than " + str(older_days) + " days")
                    delete_ami(imageID)

def get_delete_date(older_days):
	delete_time = datetime.now(tz=timezone.utc) - timedelta(days=older_days)
	return delete_time;

def delete_ami(imageID):
	print("Deregistering Image ID: " + imageID)
	client.ec2.deregister_image(ImageId=imageID)

Update SSM parameter store on another AWS account using AssumeRole

Hi,

In this post we are going to update the SSM parameter store in 2nd AWS account with the details from 1st AWS account. For this we will create a AWS Lambda function with python code. The python code will assume the role from another account and uses the temporarily generated STS credentials to connect and update the SSM parameter on the 2nd AWS account.

Create a Lambda function by selecting Python 2.7 and add the below code into it


#!/usr/bin/python

import boto3
import time

ssmparam = boto3.client('ssm')

account_id = '112211221122'
account_role = 'AssumeRole-SSM'
region_Name = 'us-east-1'

AmiId = 'ami-119c8dc1172b9c8e'

def lambda_handler(event, context):
    print("Assuming role for account: " + account_id)
    credentials = assume_role(account_id,account_role)

	#Call the function to update the SSM parameter with value
    updateSSM_otherAccount(credentials,region_Name,account_id)

def assume_role(account_id, account_role):
    sts_client = boto3.client('sts')
    role_arn = 'arn:aws:iam::' + account_id + ':role/' + account_role
    print (role_arn)

    '''Call the assume_role method of the STSConnection object and pass the role
    ARN and a role session name'''

    assuming_role = True
    assumedRoleObject = sts_client.assume_role(RoleArn=role_arn,RoleSessionName="NewAccountRole")
    print (assumedRoleObject['Credentials'])

    '''From the response that contains the assumed role, get the temporary
    credentials that can be used to make subsequent API calls'''
    return assumedRoleObject['Credentials']
    
def updateSSM_otherAccount(creds, region_Name, account_id):
    client1 = boto3.client('ssm',region_name=region_Name,aws_access_key_id=creds['AccessKeyId'],aws_secret_access_key=creds['SecretAccessKey'],aws_session_token=creds['SessionToken'])

    ssmparam_update = client1.put_parameter(Name='DevAMI',
            Description='the latest ami id of Dev env',
            Value=AmiId, Type='String', Overwrite=True)

Steps to configure AssumeRole

Note: Make sure to modify the account id’s in the below json policy

1. Add the inline policy to role attached to the lambda in 1st AWS account (556655665566)

{
    "Version": "2012-10-17",
    "Statement": [
        {
            "Sid": "123",
            "Effect": "Allow",
            "Action": [
                "sts:AssumeRole"
            ],
            "Resource": [
                "arn:aws:iam::112211221122:role/AssumeRole-SSM"
            ]
        }
    ]
}

2. Create a role in 2nd AWS account (AssumeRole-SSM) (112211221122), edit the trust relationship and add below policy.
Attach EC2 full permissions to this role so that we will get access to SSM parameter store

{
    "Version": "2012-10-17",
    "Statement": [
        {
            "Effect": "Allow",
            "Action": [
                "sts:AssumeRole"
            ],
            "Resource": "arn:aws:iam::556655665566:role/lambda-ec2-role"
        }
    ]
}

Golden image creation using Packer and AWS CodePipeline

Hi All, we know that Packer can be used to create Golden images for multiple platforms. Here we will use Packer to create an Golden image of Amazon Linux OS in AWS. The created images are called as AMI which appear in AWS dashboard. The image creation is necessarry in situations when we want the OS to have pre set of packages installed to support our application. The custom created AMI can be used to spin up EC2 instances when we need to build large infrastructure frequently to support the applications.

In this tutorial I will be using AWS CodeCommit, CodeBuild and create a CodePipeline with these. The CodePipeline will automatically get triggered when a commit happens to the CodeCommit repo. The pipeline will run the CodeBuild which will trigger the buildspec.yml and use the packer build command mentioned in it to build the Golden image (AMI)

I will be commiting 2 files to CodeCommit – buildspec.yml and CreateAMI.json file

Below is the content of buildspec.yml

---
version: 0.2

phases:
  pre_build:
    commands:
      - echo "Installing HashiCorp Packer..."
      - curl -qL -o packer.zip https://releases.hashicorp.com/packer/0.12.3/packer_0.12.3_linux_amd64.zip && unzip packer.zip
      - echo "Installing jq..."
      - curl -qL -o jq https://stedolan.github.io/jq/download/linux64/jq && chmod +x ./jq
      - echo "Validating CreateAMI.json"
      - ./packer validate CreateAMI.json
  build:
    commands:
      ### HashiCorp Packer cannot currently obtain the AWS CodeBuild-assigned role and its credentials
      ### Manually capture and configure the AWS CLI to provide HashiCorp Packer with AWS credentials
      ### More info here: https://github.com/mitchellh/packer/issues/4279
      - echo "Configuring AWS credentials"
      - curl -qL -o aws_credentials.json http://169.254.170.2/$AWS_CONTAINER_CREDENTIALS_RELATIVE_URI > aws_credentials.json
      - aws configure set region $AWS_REGION
      - echo "AWS region set is:" $AWS_REGION
      - aws configure set aws_access_key_id `./jq -r '.AccessKeyId' aws_credentials.json`
      - aws configure set aws_secret_access_key `./jq -r '.SecretAccessKey' aws_credentials.json`
      - aws configure set aws_session_token `./jq -r '.Token' aws_credentials.json`
      - echo "Building HashiCorp Packer template, CreateAMI.json"
      - ./packer build CreateAMI.json
  post_build:
    commands:
      - echo "HashiCorp Packer build completed on `date`"

Below is the content of CreateAMI.json

{
    "variables": {
        "aws_region": "{{env `AWS_REGION`}}"
    },
  "builders": [
    {
      "type": "amazon-ebs",
      "region": "{{user `aws_region`}}",
      "instance_type": "t2.micro",
      "source_ami": "ami-0080e4c5bc078760e",
      "ssh_username": "ec2-user",
      "ami_name": "custom-Dev1",
      "ami_description": "Amazon Linux Image OS with pre-installed packages",
      "run_tags": {
        "Name": "custom-Dev1",
	"Env": "dev",
	"Project": "DevOps"
      }
    }
  ],
  "provisioners": [
    {
      "type": "shell",
      "inline": [
        "sudo yum install java python wget -y",
	"sudo yum install tomcat -y"
      ]
    }
  ]
}

1. Create an AWS CodeCommit Repository and add these 2 files into it.
2. Create AWS CodeBuild project and select CodeCommit repo and master branch
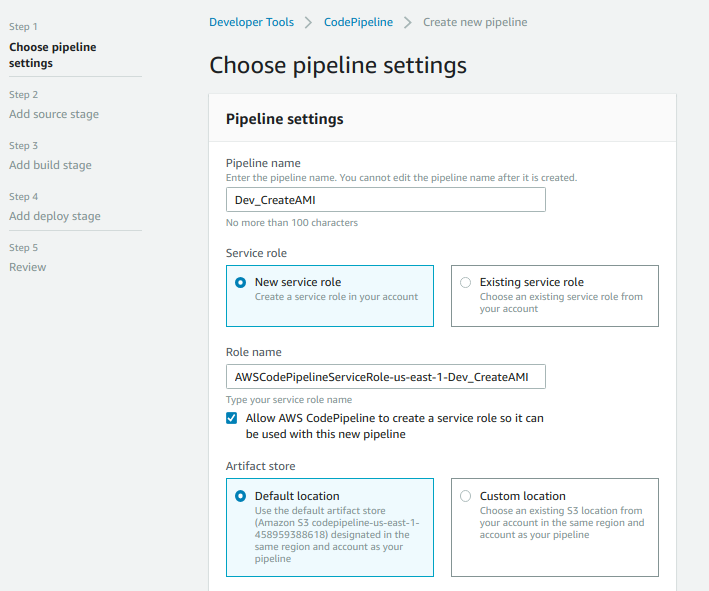
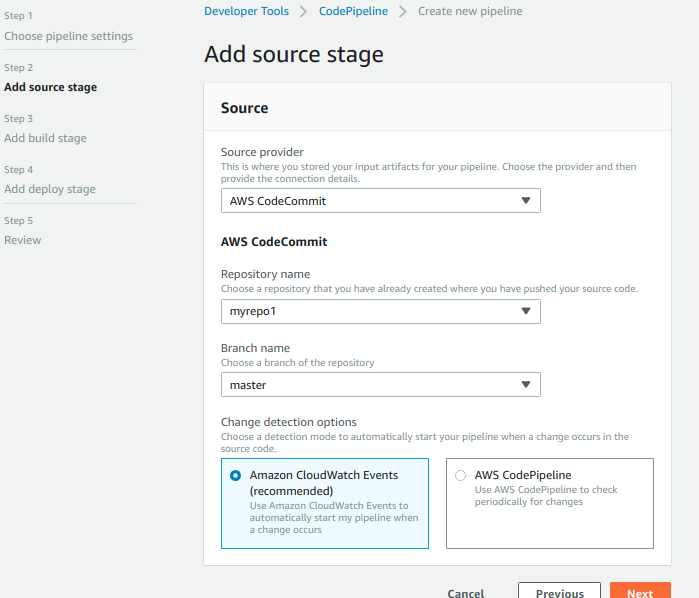
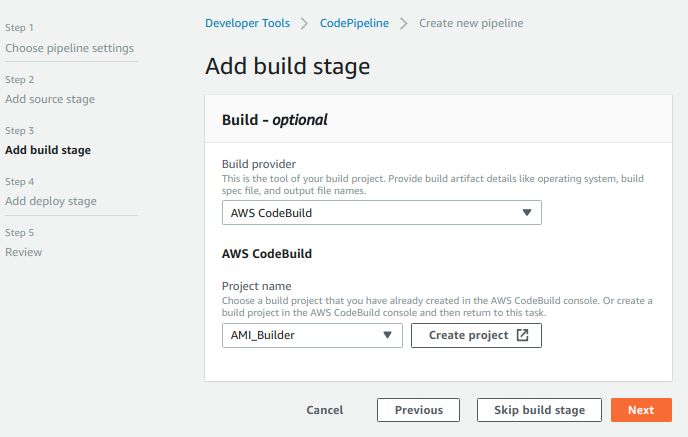
3. Create CodePipeline by selecting CodeCommit repo and CodeBuild project as stages.
Screenshot from 2018-12-19 12-06-05

Screenshot from 2018-12-19 12-07-56

Screenshot from 2018-12-19 12-08-52

Skip Deploy stage and create the pipleine.

4. Select the created CodePipeline and click on Release changes which will start running the pipeline.

5. After the pipeline finishes successfully, go to the EC2 dashboard and click on AMI in left side and you should see the created Golden image.

Azure Kubernetes Cluster (AKS) – Creation steps

Microsoft Azure is an open, flexible, enterprise-grade cloud computing platform. Azure Kubernetes Service (AKS) brings these two solutions together, allowing users to quickly and easily create fully managed Kubernetes clusters.

Here we will create Azure Kubernetes cluster (AKS) using Azure cli.
The master server of the Kubernetes cluster will be managed by Azure (this is free) and only the worker nodes will be created in Virtual machine section of the Azure. We can use the kubectl to interact with the pods.

Sign up for Microsoft Azure account with a subscription or create a new free account.

The first step is to provision a new Kubernetes cluster using the Microsoft Azure CLI. Follow these steps:

Install AZ using below command

curl -L https://aka.ms/InstallAzureCli | bash

Install Kubectl using below commands on RHEL or CentOS

sudo cat < /etc/yum.repos.d/kubernetes.repo
[kubernetes]
name=Kubernetes
baseurl=https://packages.cloud.google.com/yum/repos/kubernetes-el7-x86_64
enabled=1
gpgcheck=1
repo_gpgcheck=1
gpgkey=https://packages.cloud.google.com/yum/doc/yum-key.gpg https://packages.cloud.google.com/yum/doc/rpm-package-key.gpg
EOF

sudo yum install -y kubectl

Log in to Microsoft Azure using below command.
This will generate a url and unique code. Open the url in the browser and copy the code for login successfully.

az login

Create a resource group by mentioning the resource group name and location

az group create --name Dev-AKS --location eastus

Create a cluster by specifying the cluster name and node count as 3 nodes

az aks create --resource-group Dev-AKS --name Dev-AKS-1 --node-count 3 --enable-addons monitoring --generate-ssh-keys

Get the Credetials for the cluster which will allow to communicate with the created cluster.

az aks get-credentials --name Dev-AKS-1 --resource-group Dev-AKS

Next use kubectl commands to check cluster resources

kubectl describe cluster
kubectl get services
kubectl get pods