Bitbucket pipeline provides easy and faster way to build and deploy apps into S3 bucket. These can be ReactJs and AngularJs frontend applications.
I will walk you through how to setup bitbucket pipeline, create bitbucket pipeline yaml file and then host that into S3 using static webhosting. Also we will integrate S3 bucket with CloudFront distribution to make the web page accessible from domain name.
Steps follow as below:
- Create S3 bucket
- Configure bitbucket pipeline
- Create bitbucket-pipelines.yaml script
- Create and integrate CloudFront distribution
- Test the pipeline
Step 1: Create a S3 bucket
This bucket will contain the static pages for the webapp code.

Step 2: Enable and configure bitbucket pipeline
On the bitbucket repo, click on the “Pipelines” in the left side window and Enable it.
Next click on “Repository settings” –> “Deployments”
Here you can add the environments like dev, uat, prod etc..

Step 3: Create bitbucket-pipelines.yaml script
Create the bitbucket-pipelines.yaml script in the respective branch with below content.
The below pipeline script is for a ReactJs application, I have mentioned 2 branch names: master and uat
When the code is pushed to respective branch, the pipeline will trigger. It will fetch the environment variables given in the Deployments section. Builds the code and then copies the contents of build directory to mentioned S3 bucket. The pipeline has a step to invalidate the CloudFront cache. You will have to provide the CloudFront distribution ID as an environment variable.
To immediately serve updated files, invalidate the files to remove objects from CloudFront’s cache.
pipelines:
  branches:
    master:
      - step:
          name: Build and deploy the app on Production
          image: node:latest
          script:
            - export React_app_url="https://app.phoenix.cloud"
            - npm install
            - CI=false REACT_APPURL=$React_app_url npm run build
          artifacts:
          - build/**
      - step:
          name: Deploying the app to S3 bucket and invalidate CloudFront cache
          deployment: master
          script:
            - pipe: atlassian/aws-s3-deploy:0.2.4
              variables:
                AWS_ACCESS_KEY_ID: $AWS_ACCESS_KEY_ID
                AWS_SECRET_ACCESS_KEY: $AWS_SECRET_ACCESS_KEY
                AWS_DEFAULT_REGION: $AWS_REGION
                S3_BUCKET: $S3_BUCKET
                LOCAL_PATH: "build"
            - pipe: atlassian/aws-cloudfront-invalidate:0.1.1
              variables:
                AWS_ACCESS_KEY_ID: $AWS_ACCESS_KEY_ID
                AWS_SECRET_ACCESS_KEY: $AWS_SECRET_ACCESS_KEY
                AWS_DEFAULT_REGION: $AWS_REGION
                DISTRIBUTION_ID: $STAGING_DISTRIBUTION_ID
    uat:
      - step:
          name: Build and test the app on UAT
          image: node:latest
          script:
            - export React_app_url="https://uat-app.phoenix.cloud"
            - npm install
            - CI=false REACT_APPURL=$React_app_url npm run build
          artifacts:
          - build/**
      - step:
          name: Deploying the app to S3 bucket and invalidate CF cache
          deployment: uat
          script:
            - pipe: atlassian/aws-s3-deploy:0.2.4
              variables:
                AWS_ACCESS_KEY_ID: $AWS_ACCESS_KEY_ID
                AWS_SECRET_ACCESS_KEY: $AWS_SECRET_ACCESS_KEY
                AWS_DEFAULT_REGION: $AWS_REGION
                S3_BUCKET: $S3_BUCKET
                LOCAL_PATH: "build"
            - pipe: atlassian/aws-cloudfront-invalidate:0.1.1
              variables:
                AWS_ACCESS_KEY_ID: $AWS_ACCESS_KEY_ID
                AWS_SECRET_ACCESS_KEY: $AWS_SECRET_ACCESS_KEY
                AWS_DEFAULT_REGION: $AWS_REGION
                DISTRIBUTION_ID: $STAGING_DISTRIBUTION_ID
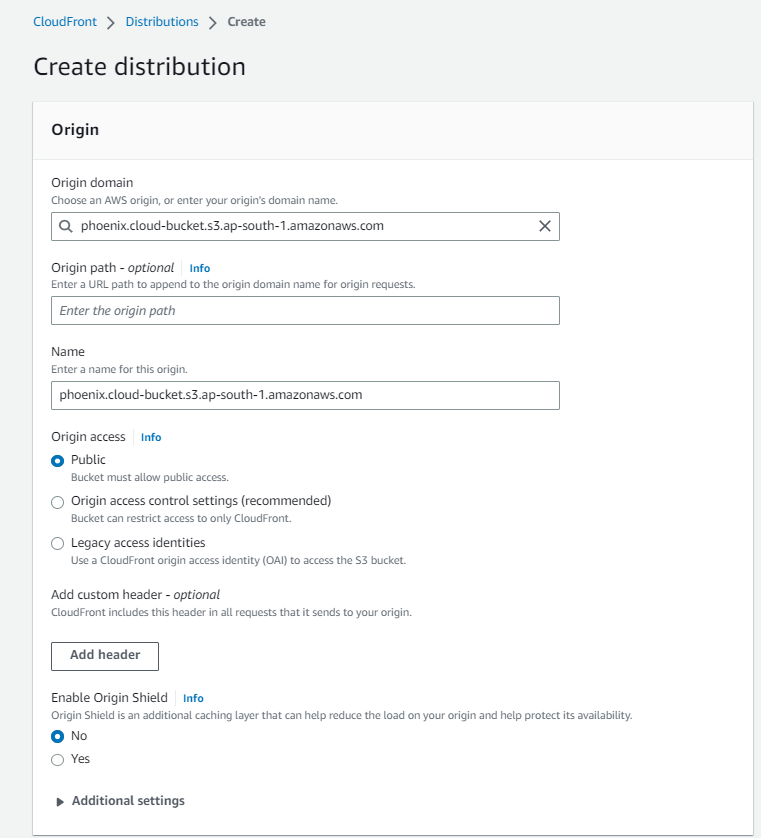
Step 4: Create and integrate CloudFront distribution
While creating CloudFront distribution it asks to choose an S3 bucket.
Step 5: Test the pipeline
Once you push the code to the repo, the pipeline will automatically run for the respective branch.

Also you can verify the CloudFront cache invalidation details from AWS console.

